Facilities Inventory: New User Guide
Last updated: July 5, 2023
Back to the Facilities Inventory Documentation
The facilities inventory system has a production site which contains the real data and a training site with a copy of the data. The training site is good for testing changes and learning how to use the system. Information on the training site is refreshed weekly from the production site at 11:23pm on Saturdays.
You have access to more than just your department/section level orgs. If you have a presence in any building you will be given access to all spaces within that building. Your department/section presence information in any space will be “editable” and all others will be “read only”.
Facilities Inventory System Documentation
Our documentation page contains links to all facilities inventory system documentation. It is available from the "Documentation" link at the top of the facilities inventory system.
Floor Plans
University floor plans are available by searching the Find Facility Information pages.
All users of the facilities inventory system have access to floor plans, restricted by NetID login.
Enter part of a facility name such as "Olin" or a facility code and search, identify the name of the facility from the list of search results, then select "Floor Plans" from the left menu to locate PDF files for each building and floor. Note that the search results may contain many entries. Those marked "Obsolete" are facilities which have been sold, demolished or are otherwise no longer active in the system. Results beginning with "P" are parking lots.
The floor plans show the room numbers for all spaces as well as the size of each room in square feet in a small box. The room size on the floor plans is the same value in the facilities inventory system under "Net Area".
Go here to see a short informational video on searching for floor plans.
Facilities Inventory System Home Page
Counts on the Home page reflect rooms and org occurrences that match your security access.
Each room has a status of OPEN, HOLD or FREEZE in the inventory system. In the fall each year, we open the inventory for editing and set all rooms to the OPEN status. You walk through the rooms, verify the room type and function codes, make any needed updates, then change the "Org Status" of the room to HOLD to indicate that you have reviewed the information about the room and confirm that it is correct. Your facilities inventory org admin then also reviews the rooms and changes the "Org Status" from HOLD to FREEZE.
The Home page shows a list of the number of rooms which each of these statuses under Room Status. The counts are based on a combination of room status and identified fields. You can use this list to see how many rooms still have the OPEN status and need to be reviewed and updated.
Org statuses for active rooms are based on room status and occurrences of an org. Since there can be multiple occurrences of an org in a single room, the number of orgs returned by this count may not match the number of rooms returned on the search results page when you select the link.
Home page counts are calculated based on the current reporting year. Room and org statuses outside this date range are not included. These counts will refresh when the system is rolled over to a new reporting cycle.
Note: Use the "Home" link rather than the back button when returning to the "Home" page.
Room Search Page
The facilities inventory system room search page is the usual starting point for updating room information. It is the page which opens when you login with your NetID and visit https://facilitiesinventory.cornell.edu.
The descriptions below describe the use of the many search options on the "Room Search" page.
Find Facility Name
This link allows you to search by any name associated with a facility, including nicknames, as long as the names have been added to the system.
Room Door Number
If the number on the outside of the door differs from the room number posted by the door, the posted door number should be added here for 911/emergency response.
Room Type
Each room in the facilities inventory system is identified by a single room type. A complete list of room types together with their descriptions is available in Appendix A of Cornell University Policy 2.7, Reporting the Use of Facilities, beginning on about page 19.
To search the inventory system by room type, select one of the types from the Room Type drop-down list on the room search page.
Coll-Div/Group, Dept/Section, &
Function Code
You can either use the drop down bar to select your option or if you know what the code is you can type it in the shorter field (“OR” option). The Coll-Div/Group and the Dept/Section drop down lists include KFS org codes followed by the chart code, then org code with name followed by code level. These fields are based on the KFS ‘tree’ – not an alpha numeric drop down and the search will return space based on the org you search on and ALL below it.
NOTE: In the drop-down lists, the easiest way to find the org you are looking for is to quickly type the org code.
Chart
This is the Cornell University fiscal chart code. Allows you to search on all the rooms in an entire chart that you have access to in security, this may return a number of rooms that can overwhelm the system buffers, use it cautiously.
- If you use the drop down or type in fields to select an org in conflict with the chart code you will return no search results
- The chart codes come directly from the Kuali Financial Services datamart.
CC/EN Field
The CC/EN field identifies the funding source for the function/activity occupying that room or portion of the room. The correct use of these codes is essential for the university to be able to generate accurate reports of room usage. More information about how to select the correct code is available on the CC/EN Code Categorization page.
Room Status
Defaults to “Active”
- Blank equals All
- New - Newly entered rooms which are not yet active
- Request Obsolete – A room which the org admin has identified as no longer needed
- Pending Obsolete - A room that the Application Manager (Facilities Inventory) has tagged to be obsolete when the update cycle is complete. These are often rooms which have been removed during a renovation.
- Obsolete – A room that is obsolete but is in the system for historical information.
Org Presence Status
You can click on more than one org status at a time using the control key.
- Blank equals All
- OPEN – A org presence that is still open to editing for changes
- HOLD – An org presence with changes completed. When in “Hold” the space inventory and "Occupant/Research" fields are “Read-Only” for department users. Org admins still have edit capabilities.
- FREEZE – An org presence with changes completed and reviewed/approved by the Org. Admin. When in “Freeze” the space inventory and Occupant/Research fields are “Read-Only” for both the department users and the Org. Admin.
- Deep Freeze – An org presence with changes completed and reviewed/approved by both the Org. Admin. and the Application Managers. When in “Deep Freeze” the space inventory and Occupant/Research fields are “Read-Only” for the department users, Org. Admin. and Application Manager
- NOTE: When system is reset for new fiscal/reporting year all org presences, other than New and Obsolete, will automatically reset to “Open”
Org Presence Fiscal Year Start Date
Defaults to Current fiscal/reporting year. Searching for Historical information will be done through the “Historical Room Search” page (See Historical Room Search documentation).
Occupant and Organized Research Information
Once this information has been added to your org presence you will be able to use these fields to narrow your search criteria.
- NOTE: If you are unsure of an occupant NetID, click on the binoculars, and you will be taken to a people search screen.
Reviewed, Estimated Sq. Ft., Has Error, Has Vacant Space
These fields are additional fields that can help you with narrow your search criteria.
Changing "Has Error" to "YES" restricts a search to only those rooms with errors.
Updated
A field that allows you to search for only updated or not updated rooms with the added ability to limit the search further by a given date.
Search Results Page
The "Search Results" page appears after you have used the "Room Search" page to search for a set of rooms. Searching for rooms can be a slow process. The facilities inventory system typical returns search results in about 15 seconds. Depending on your browser, you may be able to tell if the search is ongoing by looking at the browser tab. For example, in Chrome,
Search results are sorted by facility code and room number.
Hold Errors
If you have any {H} Hold Errors in a room record those records will appear in red. Once the errors are corrected they will turn black. We maintain a list of common room errors.
Search Criteria
Identifies the query you used for your search. It also provides the number of rooms returned as well as the total net square footage.
- Room Records – If you have more than 50 room records in your search you will see several different options.
- Show 50 Records Per Page – Gives you 50 records at a time.
- Note: if you choose this option you are limited to that grouping when you go to the Room Detail Page
- You also have the navigational links that will take you to the next 50 records, Last
- Grouping, First Grouping, or Previous Grouping.
- Show All Records – Gives you all of the records at one time.
- The system will limit you to 500 rooms.
- If you choose this option it might slow down the performance.
- Show 50 Records Per Page – Gives you 50 records at a time.
- Export Search Results to XML or Excel – Allows you to download records based on your search but will include all information associated with those records.
- The download will include the information seen on the Search Results Page as well as the occupants names, net ids, types, and dates.
- Navigating over room and function type with your mouse will tell you what the title for that particular code is.
- Updated Column – If you update/change any information in a Facilities Inventory required fields, the system will automatically tag your record as updated using your net id and the date the update was made. It will continue to change to the most recent user and date. (Space Inventory fields: Bldg. Code and Name, Room Number, Room Type Code/Description, Station Quantity, Square Footage, Org Code/Description and percentage, Function Code/Description and percentage)
- Dates associated with Org presence and Functions – Please see the detailed description of these dates in the section below titled Room Detail Page.
- Yearly Summation – The system will automatically calculate yearly percentages based on the dates and percentages used in the Room Detail Page. Please see additional details in the Room Detail Page
- Reviewer/Date/Box – This is an added field to help you in the updating process. It is up to you if you want to use it or not.
- Examples of how this might be helpful
- If you have more than one person doing the updating, one person is updating the space inventory fields and another person is updating the organized research substantiation. If both users agree to use this field you can track completed work.
- You can select one or many rooms by clicking on the box and then clicking on “Save Reviewed Rooms” Once you do that, the record will be tagged with your net id and the date you selected the reviewed box.
- If you remove the check from the reviewed box the net id and date stamp will be removed as well.
- It will continue to change to the most recent user and date. NOTE: When you’re managing a room list in the search results page make sure you click on the “Save Reviewed Rooms” button before you leave the search results page to open a room detail record. If you do not do this the system will not save the reviewed check marks, your net id, or reviewed date.
- Examples of how this might be helpful
- Notes – All note types will be stored in one location. Please see the detailed description of this in the Room Detail Page.
- N/A means you don’t have any notes associated with this record yet
- view means that you do have notes and you can access the notes window by clicking on this link.
- Select/Deselect/Reverse – This helps you with easy selection of more than one room at a time. Note: If you only want one specific room you can click on the room number link and the system will take you to that specific room detail.
- You can select a custom group of rooms by clicking on the rooms you want then click on “Edit Selected Rooms”
- Select – Selects all of the rooms, then click on “Edit Selected Rooms”
- Deselect – Removes any rooms that were previously selected, then click on “Edit Selected Rooms”
- Reverse – If there are a few rooms that you don’t want to bring forward, you can select those rooms by clicking on them and then clicking on reverse which will then deselect those and select everything else, then click on “Edit Selected Rooms”
- Edit Selected Rooms – Takes you to the Room Detail Page for rooms selected
- Bulk Edit Selected Rooms and Bulk Edit All Rooms – Please see the Bulk Edit documentation
Room Detail Page
This has detailed information associated with org presences in an individual room. If you share a room with another org their information will show as well but will be “Read-Only” to you as yours will be “Read-Only” to them. You will only be able to change information for your org presence.
Navigation Buttons
- Save Changes – After you have made your updates click on this button to save changes. Note: If your changes have been successful you will see “Your changes have been saved” at the top of your screen. If you have created a {S} Save Error you will see “Your changes have NOT been saved. Please correct the errors,” message at the top of your screen.
- Cancel Changes – If you have made changes but found that you made a mistake you can click on this button to cancel changes as long as you have not already saved the changes
- Return to Search – Takes you back to the Search Results Page
- First/Prev/Next/Last – Allows you to navigate within the rooms that you select in the Search Results Page. Note: If you make changes to a space and click on any of these buttons your information will automatically be saved unless you have a {S} Save Error which will keep you on the record with the error until it is corrected.
Hold Errors
You will not be allowed to submit your information to HOLD without correcting all of the {H} Hold Errors in your org presence of the room. The error messages will appear in red on the screen.
‘Last Out Rule’: The first org finished with their update puts their org presence in Hold status, this will freeze the room information ‘above the line’ (room type, station quantity, etc) for the other department users sharing this room record.
- Room Number, Facility Code and Floor – Appear as “Read-Only” for everyone. They can only be changed by Facilities Inventory
- Room Status – Is “Read-Only” for department users. Org. Administrators can only change to “Request Obsolete”
- Room Type/Code – Drop down list in number order. Note: If you want to select a code that is in the 300’s if you type a 3 it will take you to the 300’s.
- Has Vacant Space – This field has been added for your use only. You can use this if any part or all of the room is vacant and can then do a future search for vacant spaces. Example: You have a graduate student room with 6 work stations but you are only using 4. You can click on the vacant box and add a note to tell you that you are only using 4 of the 6 workstations.
- Brief Room Info and Room Name – These are fields that are available for your use. Note: If you have used these fields in the past for occupants you will be able to use the occupant area for that information now. Please see Occupant/Research below.
- Examples:
- You have a dedicated conference room
- You have a sub group within a given org code.
- Examples:
NOTE: “Room Name” field should contain appropriate information, not notes or duplicate of room type (Henry Doney Conference Room would be appropriate, Conference Room would not.)
- Maximum Occupancy – Please see separate Maximum Occupancy information under Documentation
- Org Code/Start Date/End Date/Percentage/Partial Year – A org presence cannot be deleted, only end dated so we have the information for historical reference. Note: If a org is end dated it will not appear in the room once we have moved to the next fiscal year. See the “Changing Org Code Information” document for additional details.
- Org Code – The drop down works like Room Search Page Dept/Section drop down
- Start Date – The date the org was added to the space.
- End Date – Is only used when that particular org is no longer associated with the room as of a given date.
- Note: ONLY end date an org presence if the org has moved. ANY record with an end date will NOT appear in your room list in the next fiscal year cycle.
- Yearly Percentage – System will calculate annual percentages.
- Partial Year Box - Only used when a space is on the path to be obsolete or if a Cornell org has vacated non-Cornell space.
- Changing an org code – ONLY change an org code for the first day of a fiscal year. In ALL other circumstances an org should be end dated and new presence made. When changing an org presence be SURE to update the start date appropriately.
- Department users have the ability to change the department presence from the org they are assigned to and any of the orgs at or below that tree. An org. administrator will need to make the change if it is for an org outside the department users assignment.
- Examples: A user assigned to a ‘D’ level org will be able to assign space to that org and any of the sections below that org.
- If the user is assigned to an ‘S’ level org and there are sub sections below that they can assign space to the sub sections but not to the ‘D’ level above them
- Keep space for one organization assigned all at the same level. If space for a single unit is assigned at both the ‘D’ and ‘S’ level there is an opportunity that searches will not return complete data or will return too much data. It is the Org Admin’s responsibility to make sure that their space is assigned at the correct level.
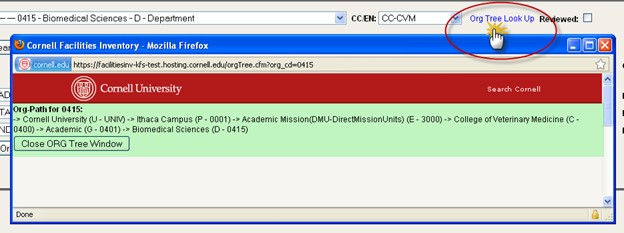
- Org Tree Look Up - displays all of the orgs above the org in the selected org presence field
Function Codes
Function Code/Description
Drop down list in numerical order. Note: If you want to select a code that is in the 4’s if you type a 4 it will take you to the 4’s
Function Code Dates
- Start Date - The date the function code was added to the space.
- End Date - Is only used when that particular function code is no longer associated with the room as of a given date.
- Note: ONLY end date an org presence if the org has moved. ANY record with an end date will NOT appear in your room list in the next fiscal year cycle.
Function Percentage
- If you use the Start and End Dates to help determine the annual percentage, then you would use 100% for that given date range.
- If you have all of your function codes extend through the fiscal year, then you can add the appropriate percentage to reflect sharing the space.
Yearly Percentage
System automatically calculates annual percentage by using the dates and percentage fields.
- Remove – Check this box if you wish to remove a function code rather than end date. Note: If you remove it will be removed and not available for historical reference in the future.
- Add Function To Org – Click on this button to add a new function code
- Change a function code – ONLY change a function code to make a correction to an error, or if a function changed at the beginning of the fiscal year. Make sure you update the start date field appropriately.
- Org Status – See Room Search Page for detailed description of each status. If you have {H} Hold Errors you do not have the ability to put the room in HOLD. If there are no errors you can click on the HOLD button and it will change the status to HOLD. Note: If you are a department user and you have a org status of HOLD and want to go back to OPEN you must contact your Org. Administrator
- Org. Administrators Only – You also have the ability to review and then send the room to Freeze or put back to Open if you would like the department user to make a change
- Occupant/Research – See Occupant/Research document in documentation tab.
- View Notes – Clicking on this link will take you to the Notes Window. Note: The system automatically defaults to showing all note types. Each note type will automatically be stamped with your net id and the date and time of note creation. Notes will appear with the most recently created first. CAUTION – A note cannot be deleted so be careful with your wordage.
- Note Type – Allows you to select which note type you would like
- Add A Comment – What you put into this box is what will appear on your note
- Filter Notes – Allows you to narrow down what you see by any one of the note types.
Facilities Search – See “Facilities Page Field Descriptions” document in documentation tab.
Documentation - Brings you to documentation and helpful information for working in this database
Reports – See “Report User Guide” document in documentation tab.