
REF 09 - Adding an Image to the Service Request
Why?
Add photos and screenshots as attachments to a Service Request (SR). Large images embedded in the Summary have caused SR workflow failures.
What changed?
All images embedded in an SR’s Summary are removed after you acknowledge a warning. The Insert Image icon has also been removed from the rich text editor on Service Requests and Work Orders.
Add photos or screenshots to an SR:
- Save the images as files on your computer or device. If they are in an email or document, save separate copies.
- Open the Service Request in Maximo.
- Enter the written details in the Summary. Refer to the attachments when helpful.
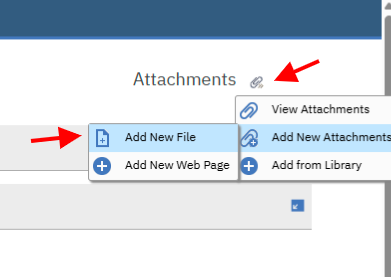
- Attach the image files to the SR.
- Save the record and confirm that the attachments open correctly.
Example:
“Water is leaking from the pipe beneath the sink in Room 210. See the attached photo showing the leak.”
If you paste content containing images
- When you click outside the Summary field, Maximo displays this warning:
“Images are not allowed in the details section. Please upload images as attachments on the Service Request”
- Click OK. Maximo removes the embedded images but keeps any text.
- Review the remaining text to confirm the request details are complete.
- Save any needed images from the original source and attach them to the SR.
Images removed from the Summary are not automatically added as attachments. You must attach them separately.