U02 - Create and Submit a Service Request in Maximo
PURPOSE:
To create and workflow a Maximo Service Request
STEPS NEEDED:
Receive or collect information about a service request to be submitted
Receive a phone call, email, or other communication about a service request that needs to be submitted.
Is the request for any of the following?
- Repairs as a result of an inspection from any compliance regulatory agency or Authority Having Jurisdiction (AHJ) or outside vendor performing inspections on anything related to compliance
- If yes, reference SOP U1a6 for specific information to include on SR while following remaining tasks this SOP
- A fume hood hibernation / un‐hibernation
- If yes, reference SOP U1b7 for specific information to include on SR while following remaining tasks in this SOP
- If none of the above, go to Task 3
- Repairs as a result of an inspection from any compliance regulatory agency or Authority Having Jurisdiction (AHJ) or outside vendor performing inspections on anything related to compliance
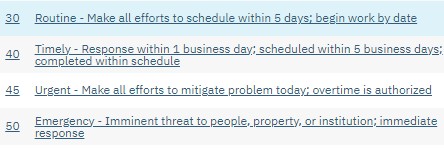
Determine the Priority1 of the request
- If it is an emergency (imminent threat to people, property, institution‐immediate response), immediately follow SOP U38 (end this SOP).
If non‐emergency, determine the priority code
Collect information at the request location
Note: Although this information is not required, it is highly recommended to include whenever possible.
- Call the requestor for the following, OR go to the physical location the request pertains to, and do the following:
- Collect or verify Maximo Asset # and/or Location # (if applicable)
- Take photo of equipment or location (save photo temporarily on your computer)
- Call the requestor for the following, OR go to the physical location the request pertains to, and do the following:
Log into Maximo with your Cornell NetID and password.
- Go to https://fcs.cornell.edu/maximo
- Under Quick Links menu on right side
- Click “Maximo Production”
- Enter login information & click "Sign In"
Create a new Service Request (SR) in Maximo:
- Click on the link on the New Service Request link on top left of the UFR Start Center.
- Enter information in the following required fields (indicated with an asterisk*):
- Reported by ‐ type the NetID, then click the tab button
- This can be you, or the person who notified you
- Summary (summary of the request)
- Internal Priority1
- As determined in Task 3 above (the default value is 30)
- Facility Code
- After typing the code, click the tab button.
- The Facility description will populate as well as the Maximo Location and Location description)
- If a GL Account3 is associated to the Location in Maximo database, the GL Account will automatically populate in the GL Account field
- Room/Area
- Type a room number or area description (for example, hallway, atrium) – any description that will help the trades find the area
- Reported by ‐ type the NetID, then click the tab button
- If necessary, enter additional information in the Details field
- Click the Save button on top menu
Does the work requested need to be started or completed by a specific date?
If no, go to Task 8.
Important: Date specific requests require 2 weeks advance notice and an explanation.
Populate the date in the “Target Start” and/or “Target Finish” field(s)
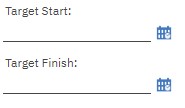
- Provide explanation of date in the “Details” field
Is the SR for a Cornell dining unit? (a Cornell dining unit, such as a dining room, cafe, food court, coffee house, convenience store)
If no, go to Task 9.
- Check the “Is Dining?” checkbox (under the Room/Area field)
- Click the Workflow button
- Select “Route to Dining”
- Click “OK”
Will the SR be put on hold? (The work will be done, but delayed start date)
If no, go Task 10.
- Click the Save button, then click the Workflow button
- Select “Put On Hold”, then click “OK”
- The SR Status4 will change to “HOLD1”
- Click the “Start Center” link at the top of the screen
- The SR will be in the “Hold SR’s Awaiting Workflow” list.
- When you are ready to continue workflowing the SR, click on the SR to open it, then continue with this SOP.
Will the SR be issued internally? (The work can be performed by non‐FCS resources / will be taken care of within your facility)
If no, go to Task 11 and follow the remaining Tasks/Steps to send the SR to FCS.
- If yes, do the following steps. If not, and the SR will be sent to Infrastructure Properties and Planning, continue to Task 11.
- Update the Service Group2 Field to the unit your facility is in (click the magnifying glass to the right of the field and select the appropriate Service Group
- Select a Service2 (optional)
- Click the Save button, then click the Workflow button
- Select “Issue Internally”, then click OK
- The Owner Group field will display “UNIT”
- The SR status4 will change from “NEW” to “PENDING”
- Important: Continue with SOP U49 (end this SOP)
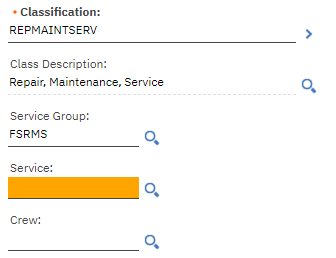
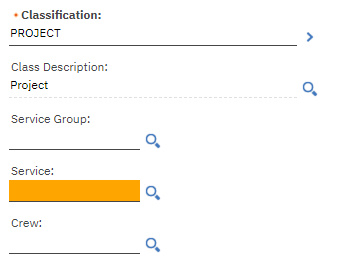
Is the “Classification2” correct? There are two SR Classifications Repair, Maintenance Service (RMS) and Project.
Classification of “REPMAINTSERV” (a.k.a RMS) (default):
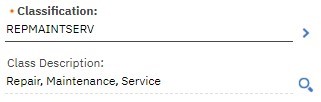
- The classification of RMS is designated for SRs for Repair, Maintenance, or Service (including Estimates)
- When a RMS SR is sent to FCS, it will automatically route directly to the FM Zone based on the Maintenance Zone field on the SR (unless it is a priority 50, which will route directly to Customer Service).
- Exceptions:
- If a facility is not in a Maintenance Zone, the SR will route to Customer Service.
- If SR has a Crew of Grounds, the SR will route to Grounds.
- If SR has a Service of Events, Reunion, or Commence, or a Crew of R5, the SR will route to FM Operations.
- If a SR has a Crew of Moving, the SR will route to the Endowed Zone.
Classification of “PROJECT”:
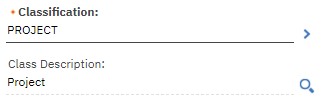
- The classification of Project is primarily designated for FCS Engineering or FCS Projects Administration SRs, with one exception (see first bullet below)
- The routing of Project SRs is dependent on the “Service” selected on the SR (see Task 15).
- Notes:
- Selection of the Service “ZONEPROJECT” will route the SR to the zone.
- All other Services will route the SR to FCS Engineering.
- Note: Maximo SRs for projects to be managed by FCS Projects Administration are to be created by FCS Projects Administration only.
- To update the Classification:
- Click the gray arrows to the right of the Classification field and click “Classify”
- Click on the blue box next to the new classification. The “Class Description” field and the “Service Group2” field will automatically update
- Click “OK”
Select or type a “Service2” The Services available are dependent on the Service Group, which updates based on the Classification
When a SR is classified (Task 11) as RMS, the Service Group2 is FSRMS, and a list of Services pertaining to RMS will be available. When a SR is classified as Project, the Service Group is FSPROJ, and a list of Services pertaining to Projects will be available. Click on the magnifying glass at end of Services field to see a list of Service options for the Classification chosen.
- To update the “Service”:
- Click on the magnifying glass to the right of the Service field and select a Service, OR
- Click on the Service field and enter a Service code
Select or type a Crew2,5 (optional)
- Click on the magnifying glass to the right of the “Crew” field to select a Crew, OR
- Click on the Crew field and enter a Crew code
- Note: REF 2 provides suggested crews for each Service
- Click the Save button
Update additional information on the SR (such as Asset, Location, or attach a photo)
- If applicable, populate the Asset or Location # you collected from the location of the request
- OR, search the Maximo database for the Asset or Location #:
- Click the gray arrows to right of the Asset or Location field and click “Select Value”
- Click the Filter button if needed
- Using the boxes at the top of the list, search10 for the Asset/Location number or description
- Select the Asset or Location number
- Click Continue
- If a photo was taken, attach photo using the “Attachments” icon (paperclip) on the top right of the screen
- Please add a note in the “Details” field indicating a photo is attached
Populate the GL account3
- If it is work that is to be paid for by the customer (Departmental)
- If departmental GL Account is populated, do nothing
- If departmental GL Account is not populated, determine the GL account (may require contacting the customer or finance rep.)
- Populate* the GL Account OR use the magnifying glass to use the GL Account string builder
- If it is work covered by the Maintenance allocation3:
- If GL Account is populated, verify that it is correct
- It may have automatically populated based on the Location number - if so, leave it as is
- If GL Account is not populated, populate correct GL Account OR use the magnifying glass to use the GL Account string builder
- Note: The “Maintenance Account” field will display “Yes” if it is a Maintenance Account. Otherwise, it will be blank.
*If typing in the GL Account, use the following format:
- IT-1234567-?????-1234
- Chart – Account - Sub Account - Object Code
Example:

- If it is work that is to be paid for by the customer (Departmental)
Review and Save the SR
- Review the SR for accurate and thorough information
- Click the Save button on top menu
Send (workflow) the SR to Facilities and Campus Services (FCS)
- Click the Workflow button on top menu
- Select “Send to FCS, then click “OK”
- You will be prompted to verify the GL Account.
- If you have not verified the GL Account, click No, then click OK, and review the GL Account3 on the SR screen (see Task 15 for more information).
- If you have verified the GL Account, click Yes, then click OK.
- The SR will route to FCS based on the Classification and Services selected in Tasks 11 and 12.
- Click “OK”
- The SR status4 will change from “NEW” to “QUEUED”
Return to your Start Center
- Click the “Start Center” link at the top of the screen
- The SR you just processed will be in the “Open SR’s In My Facilities (UFR)” list.
RESULT:
A Maximo Service Request will have been created and either put on hold, issued internally, or sent to Infrastructure Properties and Planning.
Reference Information
1Priority Levels: REF 10
2Maximo SR Classifications, Service Groups, Services: REF 2
3Maximo Facilities Management GL Accounts: REF 1
4Maximo SR and WO Status Definitions: REF 3
5Crews: REF 9
6SRs for repairs resulting from an inspection/compliance‐related: SOP U1a
7SRs for Fume Hood Hibernation/Un‐Hibernation: SOP U1b
8Triage Emergency Service Request: SOP U3
9Prepare Internally Issued Service Request: SOP U4
10Maximo Searching Tips: REF 7