T03 - Create a Desktop Requisition in Maximo - Tradesperson
Purpose: To create a requisition for materials for a Maximo work order
When: Materials are needed in order to complete the work order
Who: Tradesperson
Resources to Complete Tasks: A computer. A Maximo account, with Tradesperson access.
STEPS NEEDED:
-
Log into Maximo with your Cornell NetID and password.
- Go to https://fcs.cornell.edu/maximo
- Under Quick Links menu on right side
- Click “Maximo Production”
- Enter login information & click "Sign In"
-
Create a Material Requisition (Desktop Requisition)
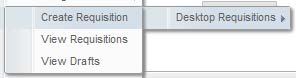
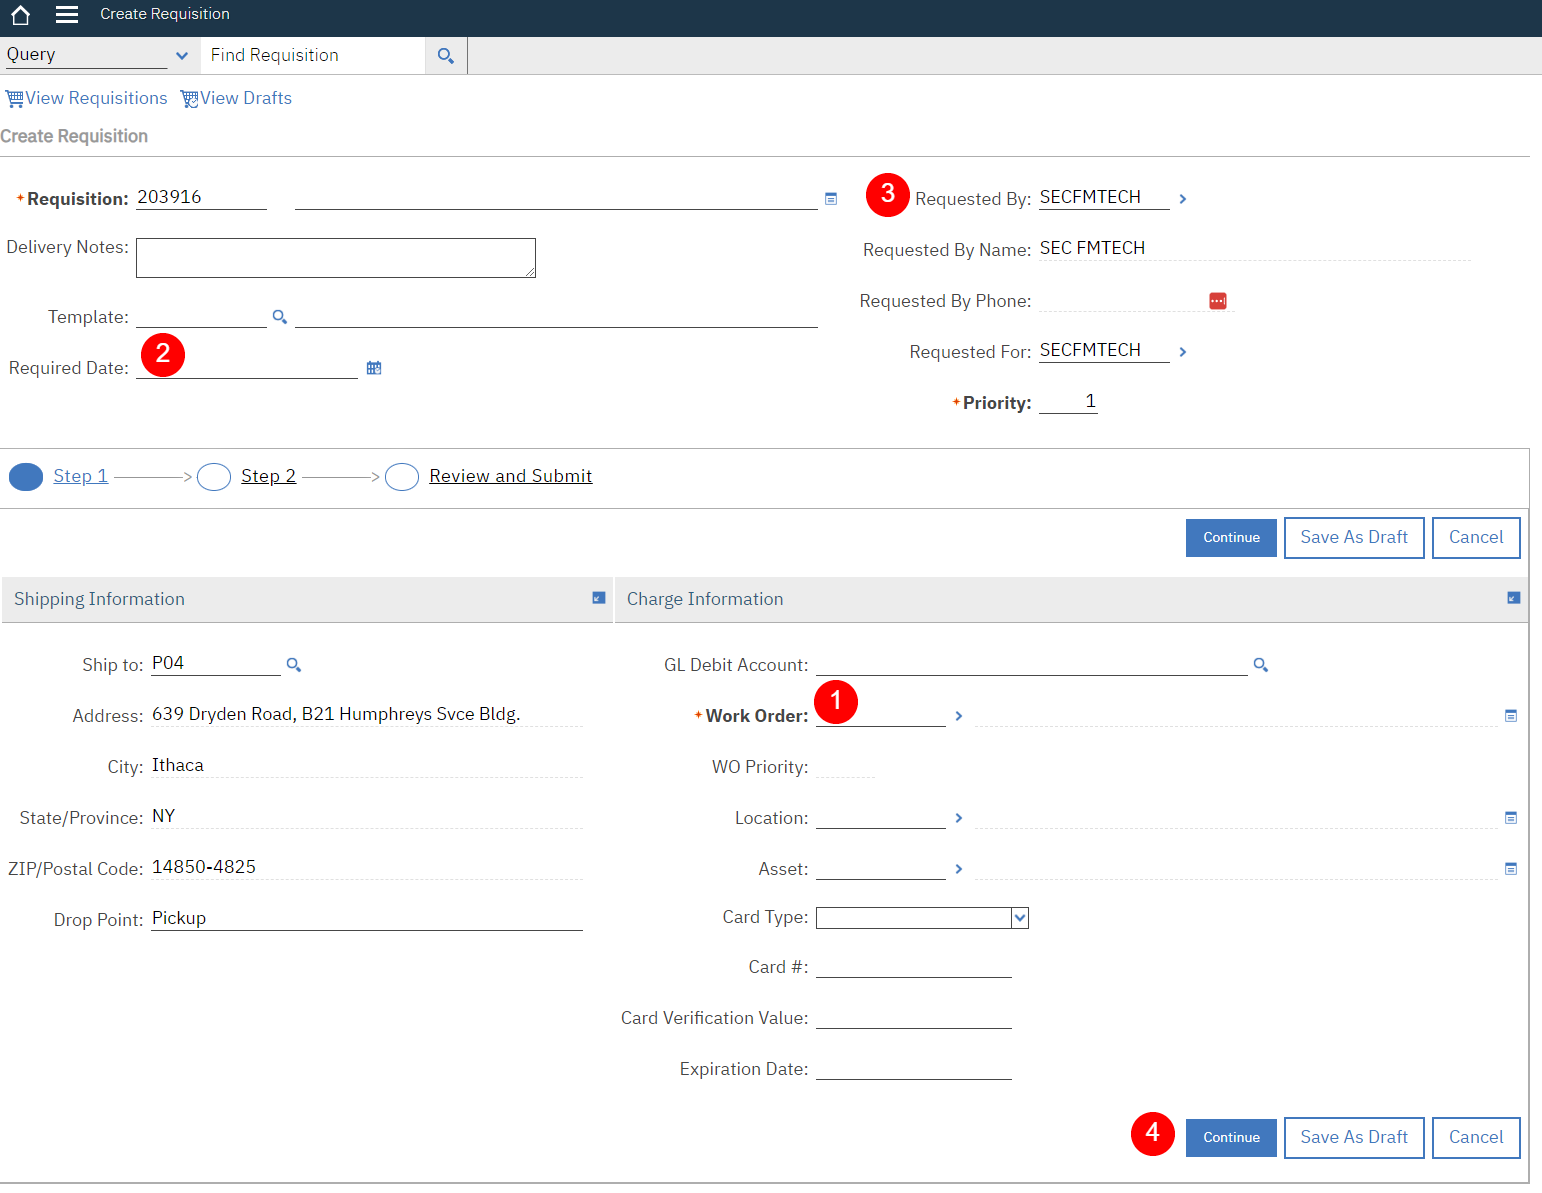
- Click on the hamburger menu then Self Service – Desktop Requisitions – Create Requisition
- In the “Work Order” field (middle right), either: (1)
• Type the work order # and then click the Tab key (this is the preferred way – the next way may take longer) OR
• Click the gray arrows to the right of the “Work Order” field, and click “Select Value” to search for and select the work order # - Optional: If materials are for a high priority work order, fill in a date in the “Required Date” field (top left).(2)
- Optional: If materials are being requested for someone else, change the “Requested By” (top right) Net ID to the person you are submitting the requisition for. That way, their name will be on the receiving label, and the requisition/PO can be looked up by their name in Maximo. (3)
- Click the “Continue” button on the bottom right (4)
- Click on the hamburger menu then Self Service – Desktop Requisitions – Create Requisition
-
Are you ordering materials or services?
- To order materials, follow steps 4 – 6.
- To order services, skip to step 7.
-
If the work order is written to an asset, there is a possibility that spare parts are associated to it. To select asset spare parts, do the following:
(If not applicable, go to Task 5)- On the bottom right of the “Requisition Line Items” section, click the “Add Line Item” button, then click “Spare Parts”
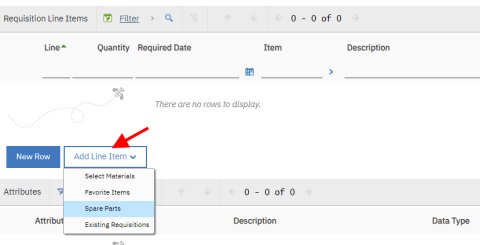
- If spare parts exist for the asset on the work order, they will show up in a list
- Check the box to the left of each Item number that you would like to order. Then, click “OK”.
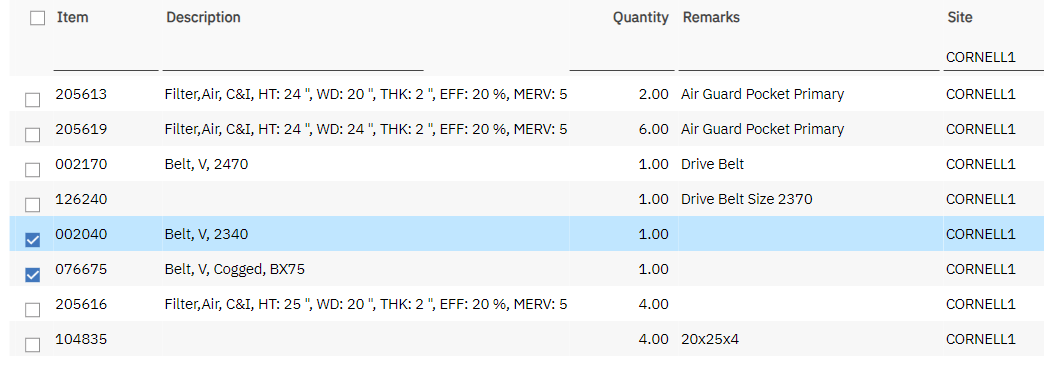
- The Item(s) will populate as a line(s) on the requisition
• For each item, specify a quantity being requested by typing a quantity in the “Quantity” field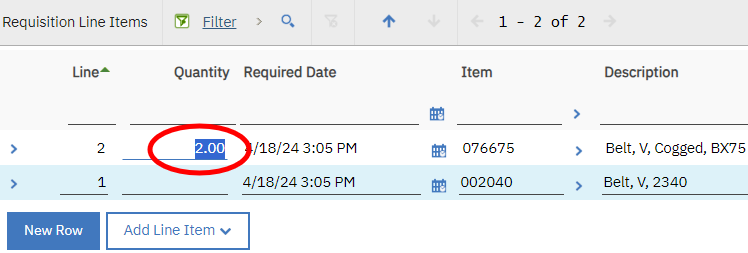
- On the bottom right of the “Requisition Line Items” section, click the “Add Line Item” button, then click “Spare Parts”
-
If the order is for an “Item” listed in Maximo, do the following:
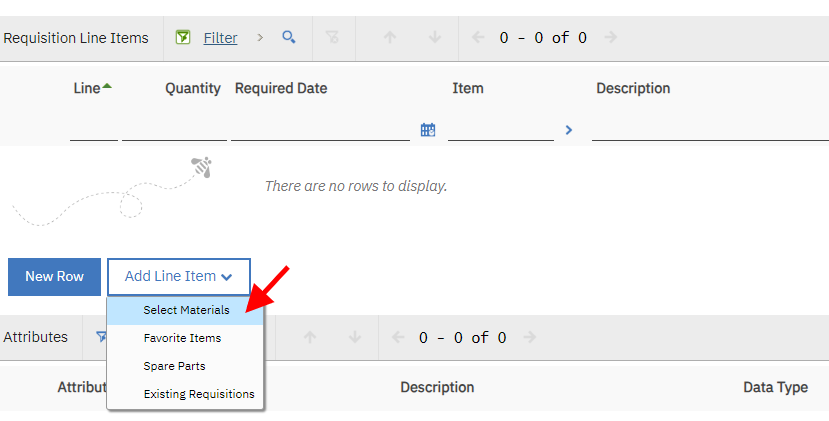
(If not applicable, go to Task 6)- On the bottom left of the “Requisition Line Items” section, click the “Add Line Item” button, then click “Select Materials”
- Click the filter button to display the filter boxes for searching
- In the “Description” field, type words describing what you are searching for, then click the “Enter” key on your keyboard.
- Description Searching Tips:
- To search for part of a word, type the asterisk symbol (*) to the right of the letters. If you don’t enter the asterisk symbol, you must type the whole word, or nothing will come up in the search. For example, if you are looking for a gasket, you can type gask* or type the whole word, gasket, then click Enter. If you type gask without an asterisk, nothing will come up.
- Do not enter special characters, like / or –
- To search for something like a 7/8” Drill Bit, try typing drill 7 8 (with a space between the 7 and 8)
- To search for a cobalt steel drill bit, try typing drill 7 8 cob*
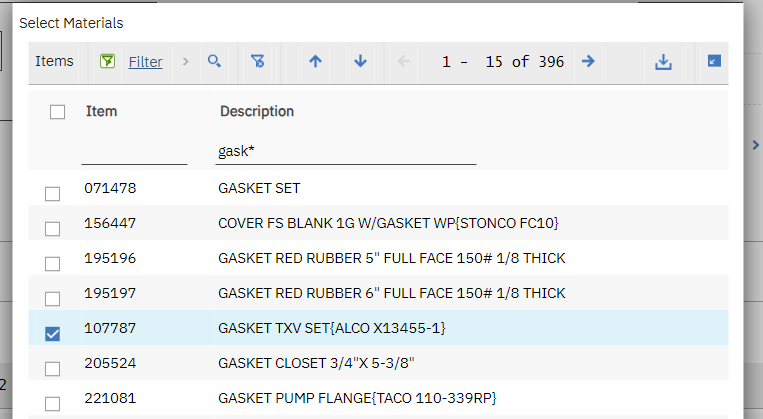
- Check the box to the left of each Item number that you would like to order. Then, click “OK”.
- If the Item was not found in the list, skip to Task 5.
- The Item(s) will populate as a line on the requisition
- For each item, specify a quantity being requested by typing a quantity in the “Quantity” field
- Repeat Task 5 for any other items needed
- On the bottom left of the “Requisition Line Items” section, click the “Add Line Item” button, then click “Select Materials”
-
If the order is for a “Material” that is not listed in the Maximo item list, do the following:
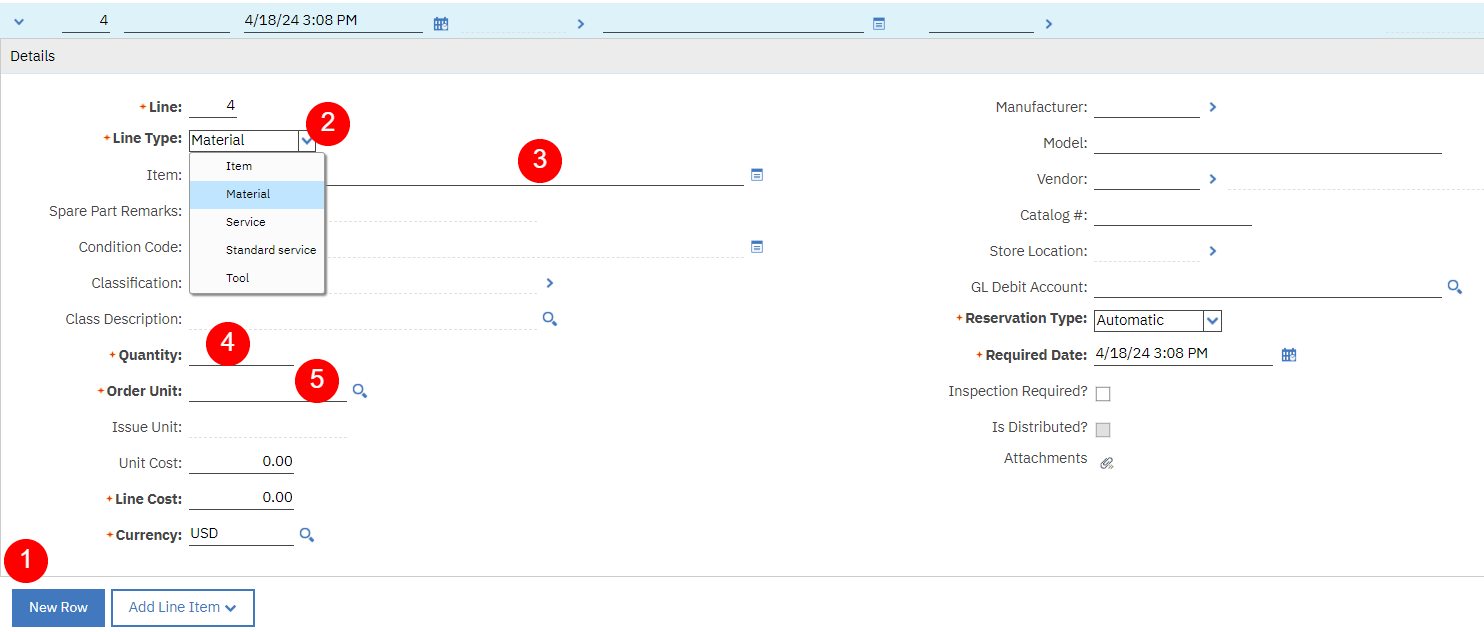
(If not applicable, go to Task 7)- On the bottom left of the “Requisition Line Items” section, click the “New Row” button (1)
- Change the Line Type to “Material” (2)
- Type a Material Description in the field directly to the right of the “Item” field (3)
- In the “Quantity” field, type a quantity (4)
- In the “Order Unit” field, type or select a unit using the magnifying glass (the majority of the time, it will be “EACH”) (5)
- Repeat Task 5, steps a-e for any other material lines needed
-
If the order is for a “Service”, do the following:
-
On the bottom left of the “Requisition Line Items” section, click the “New Row” button
-
Change the line type to “Service”
-
Type a Service Description in the field directly to the right of the “Item” field
Repeat Task 7 for any other service lines needed
-
-
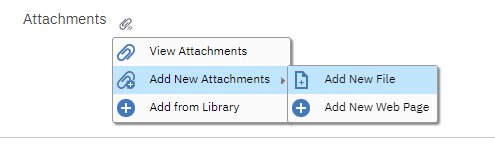
To attach a quote or a picture to a line item, do the following:
*When requesting Services, if applicable, the scope of work document and vendor quote must be attached to the requisition
Note: You may also want to type “See attached” along with the description in the “Description” field- Expand the line you want to add the attachment to by clicking on the blue triangle to the left of the line
- Click the “Attachments” icon in the middle of the screen
- Click “Add new Attachments”, then “Add New File”
- Click “Choose File”, select the file on your computer, then click “OK”
- The paperclip icon will be highlighted in orange
-
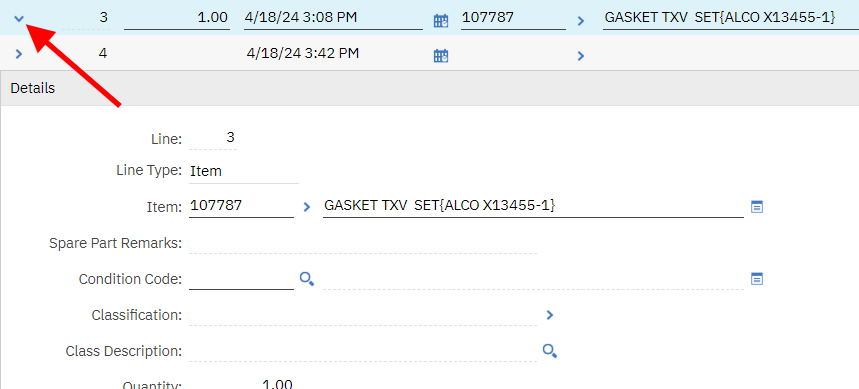
When all lines have been created, review and Save the “Draft” Requisition
- Use the triangles to the left of each line to expand/contract each line if necessary, for your review.
- When all lines have been populated correctly, click the “Continue” button
- Important: On the next screen, click the “Save As Draft” button at the bottom (Do NOT click “Submit”)
- The “Submit” button must only be clicked by a FM Procurement Team member, and only when a vendor has been populated for each requisition line item. This is because the Submit button creates a PR for each vendor and will close the requisition.

- The “Submit” button must only be clicked by a FM Procurement Team member, and only when a vendor has been populated for each requisition line item. This is because the Submit button creates a PR for each vendor and will close the requisition.
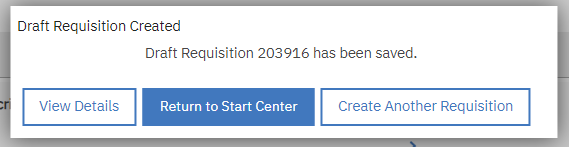
- After clicking “Save as Draft”, a box will pop up with the Draft Requisition ID #.
- Click “Return to Start Center”
- OR, if you need to create another requisition, click “Create Another Requisition” and follow this How-To, starting with Task 2.
- If you accidentally clicked the “Submit” button, call the FM Procurement Group to let them know so they can look for your requisition, as it will not be in their main queue.
- Use the triangles to the left of each line to expand/contract each line if necessary, for your review.
The Result Will Be: A Material Requisition in DRAFT status will be in the FM Procurement’s queue to process.