Two Way Radio Instructions
Instruction on how to use the Motorola HT750 Two Way Radio
Contents:
Radios
Headsets
Charging
Troubleshooting
Etiquette
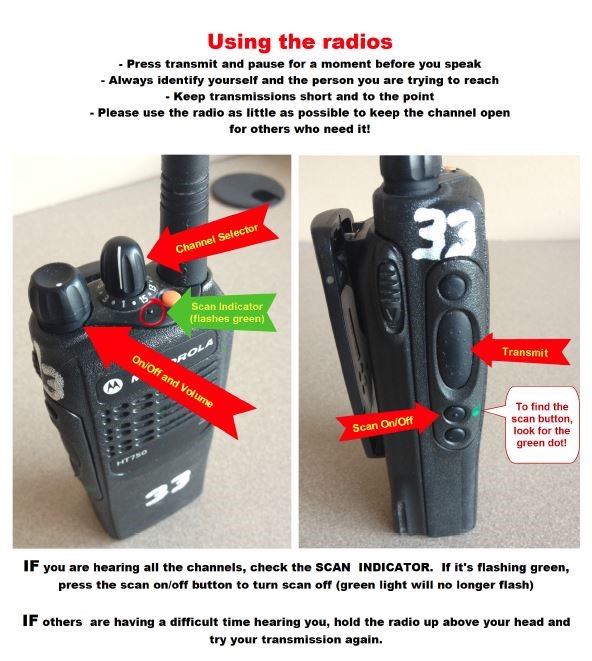
- With radio facing you - along the top from left to right
- First round dial is the On/0ff and Volume control. Turn clockwise to turn on and increase volume, counterclockwise to reduce volume. To turn off continue turning clockwise until you meet resistance – there should be a small click sound when radio is shut off.
- The next smaller dial is the Channel Selector. When you receive a radio from CS there is an assigned channel for your event or your task at the event. The channels are marked consecutively 1 . 3 . 5 and up. Only the odd numerals are shown with the dot representing the next consecutive even number.
- Right in front of the channel selector is a small Led Indicator light. The light:
- is a battery indicator
- shows if the power is on
- is on when someone is communicating on your channel
- will continuously flash if your radio is scanning channels instead of on a fixed channel.
- Beside the led indicator is a small programmable button, CS does not use this button – ignore.
- Last is the Radio Antenna. Do not bend or remove it.
- With the radio facing you along the left side
- First is a small round programmable button. CS does not use it – ignore
- Second is a large oval button, which is the Push to Talk button. Use if you are not using a headset. Hold when speaking and release when done talking.
- Next is the Scan On/Off button. For CS users the scan should always be off, check the led indicator to see if flashing, and if it is press scan button to turn off.
- Last is another programmable button CS does not use – ignore
- With the radio facing you, along the right side is the headset connector. When attaching a headset radio must be turned off. (Headset info follows)
Radio back has the Belt Clip. Do not remove.
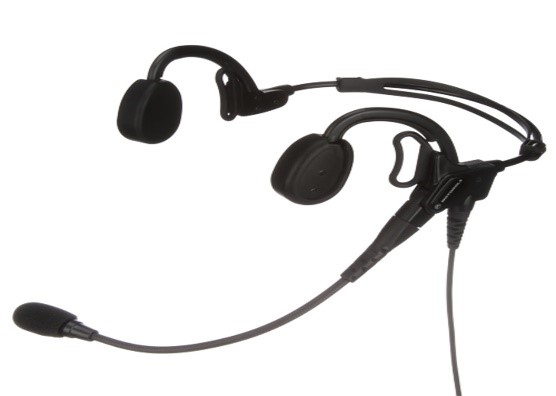
- To avoid damage headsets are not attached for transport. When attaching headset to radio make sure radio is turned off.
- Line up connectors and fasten screw until connector is firmly in place but do not keep tightening screw once secure.
- Test with another radio to see if headset receives and sends. If not, unfasten from radio and refasten making sure contacts line up and radio off.
- CS has transducing headsets, which work well in a noisy environment and a few old over the ear headsets available upon request.
- The headset fits with transducer in front of ears, band goes in the back along neck, and the mic is fully adjustable.
- Keep mic 1”-2” away from mouth for better transmission. Foam over mic is a diffuser to reduce any wind noise, do not remove.
- Press headset button on cord, then talk, and release when done.
- Please remove headsets from radios before returning to CS.
- Radios are fully charged when loaned out. When radio is off the charge will last for several days. When radio is on the charge will usually last all day depending on use.
- If you will be using the radios for more than a few hours CS can supply single and/or base (6 radio) chargers.
- Check charger for green lights before removing radio for use. If any radios do not show a green light (fully charged) check for cause.
- If any are red or flashing red take radio out and try to reseat firmly in charger so it make a connection or move to another charging cradle.
- Other issues may require battery replacement. Return radio to Customer Service for replacement radio or battery swap.

- If you are having trouble hearing others speaking, or others hearing you, make sure the volume is all the way up.
- f you can hear others but they cannot hear you check if your radio on scan and if it is press the scan button to turn off scanning.
- If the volume is turned up and you still have issues hearing:
- Try holding the radio above your head with antenna upward to improve transmission.
- If you are inside and can move outside do so.
- If you are in a basement level move up to ground level or higher.
- Always push and hold the headset button (or radio button if no headset is being used) for a couple of seconds before talking so your first words are not cut off.
- Release button immediately after finished talking.
- When contacting someone provide your name and the name of the person you are trying to reach:‘This is Linda Smith for Connie Mabry”, wait until she confirms: ‘This is Connie go ahead’, then go into message.
- Keep messages brief, remember others are monitoring the channels and may be waiting their turn to use it.
- Common radio terms to use:
- Go ahead – you are ready to receive message Ex: “This is Connie Mabry go ahead”
- Come in- asking other party to acknowledge they hear you
- Say Again – asking for retransmit of last message
- Over- your message is finished
- Out – conversation is finished
- Break, Break, Break – you are interrupting for an emergency